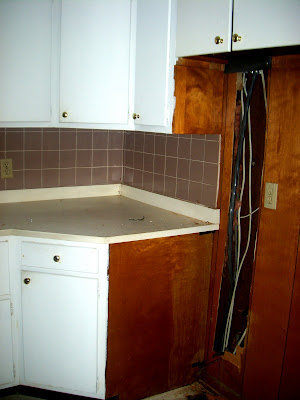
before:


after:

The biggest change in this kitchen was simply some white paint. Before the wood panelling made the kitchen seem drab and dark, and the cabinets were already white but very dirty and needed fresh paint. Also adding new, brightly painted light fixtures brightened up the room.
before:

after:

The kitchen was built on to the house, so there was a strange area above the countertop where there used to be a window. I had it covered with the panelling to make it flat again and then painted it like the rest of the walls. I also took down the paper towel holder and got one that sits on the countertop instead.
before:

after:

before:

after:


Since the kitchen is so large and open, I created a small seating area on the far wall. I needed something big and eye-catching for the wall, so I used an old icecream sign I found on the side of the road and had been saving for years. The sign was originally tan, brown, and orange, but I painted over it to make it match my bright kitchen colors.
before:

after:

Changing out the dark brown appliances to white also made a huge impact in this kitchen. The brown tile also drove me crazy, and I needed to find a real CHEAP solution. I found some patterned, white wallpaper at Lowes for $16 a roll and figured I might as well try and see if it may stick to tile. Surprisingly it did stick and is still up perfectly! We painted over it bright yellow and it made a huge difference as well.
before:


after:

I had the huge hole in the refrigerator area of the panelling fixed, and then painted white. My vintage white refrigerator I got at a garage sale for a steal of $25, fit into the spot perfectly. Also I replaced the plain gold cabinet knobs with flower shaped knobs I got off Ebay, and spray painted yellow.
before:


after:

before:

after:


I made both of my valances for my back door, and above the kitchen sheet from a vintage sheet that had a multi-color mini flower print.
before:

after:

I love the look of glass-front cabinets, and being able to see everything inside of them, but since they are very pricey, I decided to just remove the cabinet doors from the two cabinets on either side of my sink, and paint the insides. This allows me to display my favorite dishes and kitchen items.

before:


after:


Fireplaces are the perfect place to place all kinds of fun decorations. When I painted the rest of the room, I was sure to also paint all the brick and mantle of this huge fireplace. I think it makes it look much newer, brighter, and easier to decorate on.
before:

after:

before:

after:

I painted the bottom of this bamboo table white, and also painted and recovered the seats of my kitchen chairs. I love the idea of a bench or booth style seating on one side of the table, so i used a love seat that I used to have in my bedroom at my other house.

The huge spoon and fork above my couch were originally wooden and I spray painted them red. They were very prevalent in the 70s and are easy to find at yard sales or goodwills.

This basket table serves as a great place for us to put extra food and snacks. It was originally wooden with brown baskets, but I spray painted the baskets white and the outside red.


Oh my Goosh, so lovely *---* Here in Brazil is really hard to find out those things... But I want a tipically pin up home! hehe
ReplyDeleteloved your blog, come visit me, I would really like to talk to you more :)
diariodeumapinup.blogspot.com